1
2
3
4
5
6
7
8
9
10
11
12
13
14
15
16
17
18
19
20
21
22
23
24
25
26
27
28
29
30
31
32
33
34
35
36
37
38
39
40
41
42
43
44
45
46
47
48
49
50
51
52
53
54
55
56
57
58
59
60
61
62
63
64
65
66
67
68
69
70
71
72
73
74
75
76
77
78
79
80
81
82
83
84
85
86
87
88
89
90
91
92
93
94
95
96
97
98
99
100
101
102
103
104
105
106
107
108
import 'package:flutter/cupertino.dart';
import 'package:flutter/material.dart';

class Toast {
static OverlayEntry _overlayEntry; // toast靠它加到屏幕上
static bool _showing = false; // toast是否正在showing
static DateTime _startedTime; // 开启一个新toast的当前时间,用于对比是否已经展示了足够时间
static String _msg; // 提示内容
static int _showTime; // toast显示时间
static Color _bgColor; // 背景颜色
static Color _textColor; // 文本颜色
static double _textSize; // 文字大小
static String _toastPosition; // 显示位置
static double _pdHorizontal; // 左右边距
static double _pdVertical; // 上下边距
static void toast(
BuildContext context, {
String msg,
int showTime = 2000,
Color bgColor = Colors.black,
Color textColor = Colors.white,
double textSize = 14.0,
String position = 'center',
double pdHorizontal = 20.0,
double pdVertical = 10.0,
}) async {
assert(msg != null);
_msg = msg;
_startedTime = DateTime.now();
_showTime = showTime;
_bgColor = bgColor;
_textColor = textColor;
_textSize = textSize;
_toastPosition = position;
_pdHorizontal = pdHorizontal;
_pdVertical = pdVertical;
//获取OverlayState
OverlayState overlayState = Overlay.of(context);
_showing = true;
if (_overlayEntry == null) {
_overlayEntry = OverlayEntry(
builder: (BuildContext context) => Positioned(
//top值,可以改变这个值来改变toast在屏幕中的位置
top: _calToastPosition(context),
child: Container(
alignment: Alignment.center,
width: MediaQuery.of(context).size.width,
child: Padding(
padding: EdgeInsets.symmetric(horizontal: 40.0),
child: AnimatedOpacity(
opacity: _showing ? 1.0 : 0.0, //目标透明度
duration: _showing
? Duration(milliseconds: 100)
: Duration(milliseconds: 400),
child: _buildToastWidget(),
),
)),
));
overlayState.insert(_overlayEntry);
} else {
//重新绘制UI,类似setState
_overlayEntry.markNeedsBuild();
}
await Future.delayed(Duration(milliseconds: _showTime)); // 等待时间

//2秒后 到底消失不消失
if (DateTime.now().difference(_startedTime).inMilliseconds >= _showTime) {
_showing = false;
_overlayEntry.markNeedsBuild();
await Future.delayed(Duration(milliseconds: 400));
_overlayEntry.remove();
_overlayEntry = null;
}
}

//toast绘制
static _buildToastWidget() {
return Center(
child: Card(
color: _bgColor,
child: Padding(
padding: EdgeInsets.symmetric(
horizontal: _pdHorizontal, vertical: _pdVertical),
child: Text(
_msg,
style: TextStyle(
fontSize: _textSize,
color: _textColor,
),
),
),
),
);
}

// 设置toast位置
static _calToastPosition(context) {
var backResult;
if (_toastPosition == 'top') {
backResult = MediaQuery.of(context).size.height * 1 / 4;
} else if (_toastPosition == 'center') {
backResult = MediaQuery.of(context).size.height * 2 / 5;
} else {
backResult = MediaQuery.of(context).size.height * 3 / 4;
}
return backResult;
}
}

调用:

1
Toast.toast(context, (msg: "吐司文案"));

1
2
3
4
5
6
7
8
9
10
11
12
13
14
15
16
17
18
19
20
21
22
import 'package:flutter/material.dart';

class ColorsUtil {
/// 十六进制颜色,
/// hex, 十六进制值,例如:0xffffff,
/// alpha, 透明度 [0.0,1.0]
static Color hexColor(int hex, {double alpha = 1}) {
if (alpha < 0) {
alpha = 0;
} else if (alpha > 1) {
alpha = 1;
}
return Color.fromRGBO((hex & 0xFF0000) >> 16, (hex & 0x00FF00) >> 8,
(hex & 0x0000FF) >> 0, alpha);
}
}

TextStyle title16Bold = new TextStyle(
color: Colors.white,
fontSize: 16.0,
fontWeight: FontWeight.w900,
);

调用:

1
ColorsUtil.hexColor(0x072057);

  1. 按下时都会有“水波动画”(又称“涟漪动画”,就是点击时按钮上会出现水波荡漾的动画)。
  2. 有一个 onPressed 属性来设置点击回调,当按钮按下时会执行该回调,如果不提供该回调则按钮会处于禁用状态,禁用状态不响应用户点击。
1
2
3
4
5
6
7
8
9
10
11
12
13
14
15
16
17
18
19
20
21
22
23
24
25
26
27
28
29
30
31
32
33
34
35
36
37
38
39
40
41
42
43
44
45
46
47
48
49
// "漂浮"按钮,它默认带有阴影和灰色背景。按下后,阴影会变大
RaisedButton(
child: Text("normal"),
onPressed: () {}, // 按钮点击回调@required(回调为空时按钮禁用)
textColor: Colors.blue, // 按钮点击回调
disabledTextColor: Colors.grey, // 按钮禁用时的文字颜色
color: Colors.red, // 按钮背景颜色
highlightColor: Colors.yellow, // 按钮按下时的背景颜色
splashColor: Colors.green, // 点击时,水波动画中水波的颜色
colorBrightness: Brightness.dark, // 按钮主题,默认是浅色主题
padding: EdgeInsets.all(3.0), //按钮的填充
shape: RoundedRectangleBorder(
borderRadius: BorderRadius.circular(20.0),
), //外形
elevation: 6.0, // 正常状态下的阴影
highlightElevation: 20.0, // 按下时的阴影
disabledElevation: 0.0, // 禁用时的阴影
),
// 扁平按钮,默认背景透明并不带阴影。按下后,会有背景色
FlatButton(
child: Text("normal"),
onPressed: () {},
),
// 默认有一个边框,不带阴影且背景透明。按下后,边框颜色会变亮、同时出现背景和阴影(较弱)
OutlineButton(
child: Text("normal"),
onPressed: () {},
),
// 一个可点击的Icon,不包括文字,默认没有背景,点击后会出现背景
IconButton(
icon: Icon(Icons.thumb_up),
onPressed: () {},
),
// 带图标的按钮RaisedButton、FlatButton、OutlineButton都有一个icon 构造函数,通过它可以轻松创建带图标的按钮
RaisedButton.icon(
icon: Icon(Icons.send),
label: Text("发送"),
onPressed: () {},
),
OutlineButton.icon(
icon: Icon(Icons.add),
label: Text("添加"),
onPressed: () {},
),
FlatButton.icon(
icon: Icon(Icons.info),
label: Text("详情"),
onPressed: () {},
),

1
2
3
4
5
6
7
8
9
10
11
12
13
14
15
16
17
18
19
20
21
22
23
24
25
26
27
28
29
30
31
32
33
34
35
36
37
38
39
40
41
42
43
import 'package:flutter/material.dart';

class GestureDetectorTestRoute extends StatefulWidget {
@override
_GestureDetectorTestRouteState createState() =>
new _GestureDetectorTestRouteState();
}

class _GestureDetectorTestRouteState extends State<GestureDetectorTestRoute> {
String _operation = "No Gesture detected!"; //保存事件名
@override
Widget build(BuildContext context) {
return Scaffold(
appBar: AppBar(
title: Text("手势检测(点击、双击、长按)"),
),
body: Container(
child: GestureDetector(
child: Container(
alignment: Alignment.center,
color: Colors.blue,
width: 200.0,
height: 100.0,
child: Text(
_operation,
style: TextStyle(color: Colors.white),
),
),
onTap: () => updateText("Tap点击"), //点击
onDoubleTap: () => updateText("DoubleTap双击"), //双击
onLongPress: () => updateText("LongPress长按"), //长按
),
),
);
}

void updateText(String text) {
//更新显示的事件名
setState(() {
_operation = text;
});
}
}

1
2
3
4
5
6
7
8
9
10
11
12
13
14
15
16
17
18
19
20
21
22
23
24
25
26
27
28
29
30
31
32
33
34
35
36
37
import 'package:flutter/material.dart';

class InitFlatButton extends StatefulWidget {
final _buttonTitle;
final _buttonRoute;

InitFlatButton(this._buttonTitle, this._buttonRoute);

@override
_InitFlatButtonState createState() => _InitFlatButtonState();
}

class _InitFlatButtonState extends State<InitFlatButton> {
@override
Widget build(BuildContext context) {
return FlatButton(
onPressed: () {
Navigator.pushNamed(context, widget._buttonRoute);
},
highlightColor: Colors.transparent,
splashColor: Colors.transparent,
child: Flex(
direction: Axis.horizontal,
children: <Widget>[
Expanded(
flex: 1,
child: Text(
widget._buttonTitle,
style: TextStyle(color: Colors.white),
),
),
Icon(Icons.keyboard_arrow_right, color: Colors.white),
],
),
);
}
}

Image widget 有一个必选的 image 参数,它对应一个 ImageProvider。下面我们分别演示一下如何从 asset 和网络加载图片。

从 asset 中加载图片

  1. 在工程根目录下创建一个 images 目录,并将图片 avatar.png 拷贝到该目录。
  2. 在 pubspec.yaml 中的 flutter 部分添加如下内容:
    1
    2
    assets:
    - images/avatar.png
    注意: 由于 yaml 文件对缩进严格,所以必须严格按照每一层两个空格的方式进行缩进,此处 assets 前面应有两个空格。
  3. 加载该图片
    1
    2
    3
    4
    Image(
    image: AssetImage("images/avatar.png"),
    width: 100.0
    );
    Image 也提供了一个快捷的构造函数 Image.asset 用于从 asset 中加载、显示图片:
    1
    Image.asset("images/avatar.png", (width: 100.0));

从网络加载图片

1
2
3
4
5
Image(
image: NetworkImage(
"https://avatars2.githubusercontent.com/u/20411648?s=460&v=4"),
width: 100.0,
)
阅读全文 »

1
2
3
4
5
6
7
8
9
10
11
12
13
14
15
16
Text(
"Hello World!" * 12, // 文本重复次数
textAlign: TextAlign.center, // 文本的对齐方式
maxLines: 1, // 指定文本显示的最大行数
overflow: TextOverflow.ellipsis, // 指定截断方式,默认是直接截断
textScaleFactor: 0.8, // 文本相对于当前字体大小的缩放因子
style: TextStyle(
height: 2, // 行高 具体的行高等于fontSize*height
color: Colors.blue, // 字体颜色
fontSize: 18.0, // 精确指定字体大小
fontFamily: "Courier", // 字体系列
background: new Paint()..color = Colors.yellow, // 文本背景
decoration: TextDecoration.underline, // 文本下划线
decorationStyle: TextDecorationStyle.dashed, // 下划线样式
),
)

1
2
3
4
5
6
7
8
9
10
11
12
13
14
15
16
17
18
19
20
21
22
23
24
25
26
27
28
29
30
31
32
33
34
35
36
37
38
39
40
41
42
43
44
45
46
47
48
49
50
51
52
53
54
55
56
57
58
59
60
61
62
63
64
65
66
67
68
69
70
71
72
73
74
75
76
77
78
79
80
81
82
83
84
85
86
87
88
89
90
91
92
93
94
95
96
97
98
99
100
101
102
103
104
105
106
107
108
109
110
111
112
113
114
115
116
117
118
119
120
121
122
123
124
125
126
127
128
129
130
131
132
133
134
135
136
137
138
139
140
141
142
143
144
145
146
147
148
149
150
151
152
// 打印类属性、方法定义
const Print = function (dom, options) {
if (!(this instanceof Print)) return new Print(dom, options);

this.options = this.extend(
{
noPrint: ".no-print"
},
options
);

if (typeof dom === "string") {
this.dom = document.querySelector(dom);
} else {
this.isDOM(dom);
this.dom = this.isDOM(dom) ? dom : dom.$el;
}

this.init();
};
Print.prototype = {
init: function () {
var content = this.getStyle() + this.getHtml();
this.writeIframe(content);
},
extend: function (obj, obj2) {
for (var k in obj2) {
obj[k] = obj2[k];
}
return obj;
},

getStyle: function () {
var str = "",
styles = document.querySelectorAll("style,link");
for (var i = 0; i < styles.length; i++) {
str += styles[i].outerHTML;
}
str +=
"<style>" +
(this.options.noPrint ? this.options.noPrint : ".no-print") +
"{display:none;}</style>";
str +=
"<style> table {border: 1px solid #000;} .el-table__header {border: 1px solid #000;border-bottom: none;} .el-table__body {border-top: none;} .el-table td, .el-table th.is-leaf {border: 1px solid #000; border-right: 1px solid #000;} .print-title-content {display:block !important;} #backBtn {display:none;} #img-wrapper {display:block !important;} #echarts {display:none;} .box-card {border: 1px solid #000;} .el-tabs__header {display:none !important;}</style>";

return str;
},

getHtml: function () {
var inputs = document.querySelectorAll("input");
var textareas = document.querySelectorAll("textarea");
var selects = document.querySelectorAll("select");

for (var k = 0; k < inputs.length; k++) {
if (inputs[k].type == "checkbox" || inputs[k].type == "radio") {
if (inputs[k].checked == true) {
inputs[k].setAttribute("checked", "checked");
} else {
inputs[k].removeAttribute("checked");
}
} else if (inputs[k].type == "text") {
inputs[k].setAttribute("value", inputs[k].value);
} else {
inputs[k].setAttribute("value", inputs[k].value);
}
}

for (var k2 = 0; k2 < textareas.length; k2++) {
if (textareas[k2].type == "textarea") {
textareas[k2].innerHTML = textareas[k2].value;
}
}

for (var k3 = 0; k3 < selects.length; k3++) {
if (selects[k3].type == "select-one") {
var child = selects[k3].children;
for (var i in child) {
if (child[i].tagName == "OPTION") {
if (child[i].selected == true) {
child[i].setAttribute("selected", "selected");
} else {
child[i].removeAttribute("selected");
}
}
}
}
}

return this.dom.outerHTML;
},

writeIframe: function (content) {
var w,
doc,
iframe = document.createElement("iframe"),
f = document.body.appendChild(iframe);
iframe.id = "myIframe";
//iframe.style = "position:absolute;width:0;height:0;top:-10px;left:-10px;";
iframe.setAttribute(
"style",
"position:absolute;width:0;height:0;top:-10px;left:-10px;"
);
w = f.contentWindow || f.contentDocument;
doc = f.contentDocument || f.contentWindow.document;
doc.open();
doc.write(content);
doc.close();
var _this = this;
iframe.onload = function () {
_this.toPrint(w);
setTimeout(function () {
document.body.removeChild(iframe);
}, 100);
};
},

toPrint: function (frameWindow) {
try {
setTimeout(function () {
frameWindow.focus();
try {
if (!frameWindow.document.execCommand("print", false, null)) {
frameWindow.print();
}
} catch (e) {
frameWindow.print();
}
frameWindow.close();
}, 10);
} catch (err) {
console.log("err", err);
}
},
isDOM: function (obj) {
if (typeof HTMLElement === "object") {
return obj instanceof HTMLElement;
} else {
return (
obj &&
typeof obj === "object" &&
obj.nodeType === 1 &&
typeof obj.nodeName === "string"
);
}
}
};
const MyPlugin = {};
MyPlugin.install = function (Vue, options) {
// 4. 添加实例方法
Vue.prototype.$print = Print;
};
export default MyPlugin;

技术类型UI 渲染方式性能开发效率动态化框架代表
H5+原生WebView 渲染一般支持Cordova、Ionic
JavaScript+原生渲染原生控件渲染支持RN、Weex
自绘UI+原生调用系统 API 渲染Flutter 高, QT 低默认不支持 QT、Flutter

Flutter 使用了 Dart 语言。它的整体的 UI 构建思想和前端和原生移动端是有极大差别的。

一切皆是 Widgets。

整个页面其实就是由 Widgets 嵌套组成的控件树,而所有的基础控件,全部继承自 Widgets。而且 Flutter 控件的概念和前端,移动端也有差别。例如一个按钮,移动端一个按钮,会给它设置宽高,位置,颜色,文字。这些属性共同构成了一个按钮。但是在 Flutter 中并不是这样,颜色本身,就是一个控件,位置本身也是一个控件。当你需要一个按钮出现在正确的位置,长得正确,并且做正确的事,你就需要嵌套 4,5 层的不同控件,每一层的控件,都会将界面效果本身以 child:Widgets()的形式传递下去。

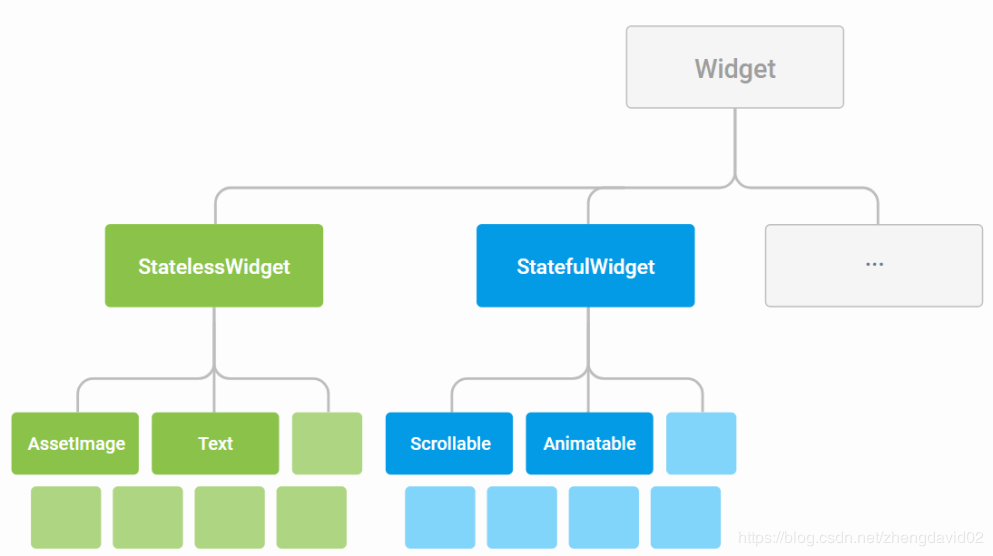
控件本身分为 StatelessWidget 和 StatefulWidget 两种状态。

  • 从下图中我们也能看到,StatefulWidget 的功能是帮助界面进行动态展示,而 StatelessWidget
  • 则是一个静态展示的效果。因此我们也就可以简单的理解,StatefulWidget 的控件可以改变自身的状态,而 StatelessWidget 不能改变自身的状态,类似一个 final 的效果。但是不同的是,StatelessWidget 的控件可以通过嵌套,让包裹着它的父 Widget 控件来改变它的状态。
阅读全文 »